You want privacy without blocking light, texture without visual clutter, and style without the eye-roll price tag? Enter the wood lattice room divider—aka the MVP of open-plan spaces. It’s breezy, sculptural, and surprisingly luxe (even when it’s not). Whether your vibe is Japandi, boho, modern farmhouse, or clean minimal, there’s a lattice look that’ll steal the show—in a chill way.
Let’s turn that wide-open room into a space with zones, charm, and a little mystery. Here are five creative ways to use wood lattice dividers that feel intentional, designer-level, and totally do-able.
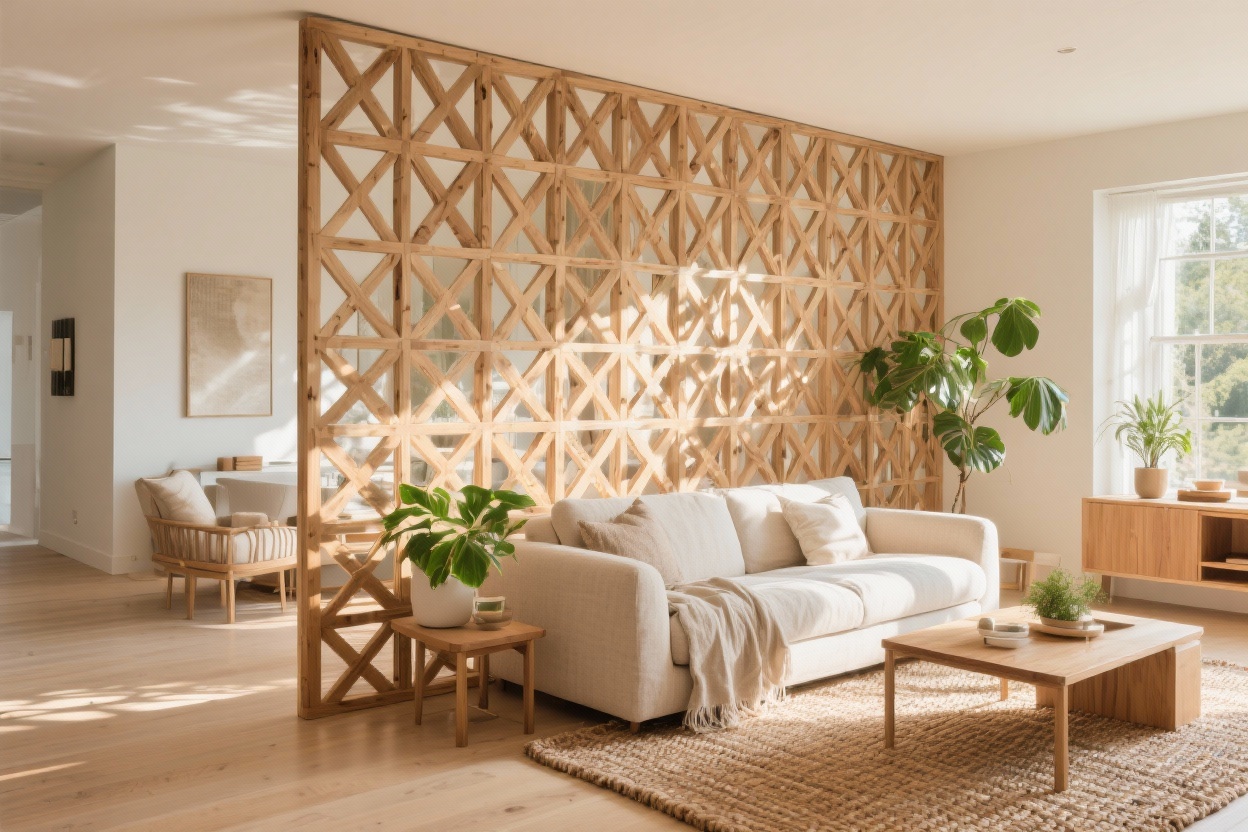
1. Float A Light-Filled “Wall” To Define Zones

Open floor plans are great until your living room and dining table are basically roommates. A freestanding lattice screen gives you shape and separation without making the room feel smaller. Bonus: the grid casts pretty shadows that make your space feel custom.
Why It Works
- Airy privacy: You get separation without losing sunlight or airflow.
- Visual rhythm: Repeating patterns calm an open room and guide the eye.
- Flexible layout: Move it when you rearrange (you will).
Style Moves
- Match your wood tone: Echo your floors or dining table for a cohesive look.
- Play with scale: Use a larger lattice pattern in small rooms to feel more open; go tighter for more privacy.
- Go sculptural: Try arched or wavy-top panels for a soft, custom vibe.
Quick Tips
- Place the divider behind a sofa to create a hallway or reading nook.
- Leave 6–10 inches from the wall so it doesn’t feel like a barricade.
- Anchor with a console table or plant to finish the “zone.”
Pro tip: If you’re renting, get a folding jointed screen—no holes, no drama.
2. Build A Semi-Open Entryway (Even If You Don’t Have One)

No foyer? Fake one. A ceiling-mounted lattice partition near the door gives you a sense of arrival and a spot to stash keys, hats, and the mail avalanche. It makes the space feel layered and intentional—like a boutique hotel lobby, but with snacks.
Design Details
- Ceiling to floor: Full-height panels feel architectural, not temporary.
- Offset the doorway: Run the divider a few feet inside the room to create a subtle “pause.”
- Integrate storage: Add a slim bench or floating shelf on the entry side.
Material + Finish Ideas
- Light oak + matte clear coat: Scandinavian calm, especially with white walls.
- Walnut stain: Warm and moody—great with brass hooks and leather baskets.
- Painted lattice: Crisp white or deep charcoal for modern contrast (FYI: paint fills wood grain, stain keeps it organic).
Safety check: Use secure ceiling brackets and L-brackets at the base (hidden behind baskets or a bench). You want design vibes, not a topple hazard.
3. Add Texture Behind The Bed Without A Bulky Headboard

Want a room that whispers “spa” instead of “college apartment?” Skip a massive headboard and install a wood lattice panel behind the bed. It adds texture, height, and a luxe custom feel—without making the wall feel heavy.
How To Nail The Look
- Go wider than the bed: Extend the panel 6–12 inches past each side for a designer finish.
- Mind the spacing: A medium lattice grid feels balanced—tight patterns can feel busy up close.
- Back it: Paint the wall a contrasting color so the pattern pops (sage, clay, or midnight blue = chef’s kiss).
Layered Bedroom Styling
- Add linen curtains on either side of the panel for softness.
- Mix in curvy lamps to contrast the grid’s straight lines.
- Use nubby throws and a handwoven rug to double down on texture.
DIY note: Use French cleats to hang the panel. They’re strong, removable, and make you feel like a fancy carpenter, IMO.
4. Create A Breezy Kitchen Screen (Without Blocking The Good Light)

Open kitchens are great for entertaining…and reminding you of dishes. A partial-height lattice divider at the end of a peninsula or between kitchen and living keeps the mess partially hidden while still letting light spill through. It’s the chic way to say “I’m busy cooking, do not perceive me.”
Smart Placement
- End of island: Add a short lattice wing that defines the traffic flow.
- Between beams: If you have exposed beams, set panels between them for a bespoke look.
- As a shelf-back: Lattice behind open shelves gives depth and shadow play.
Finishes That Survive Kitchens
- Hardwoods: White oak, maple, or teak handle humidity better.
- Sealed surfaces: Use water-based polyurethane or hardwax oil—wipes clean, stays matte.
- Grease zones: Keep lattice at least a few feet from the stove, or opt for a washable painted finish.
Light trick: Align the lattice pattern so pendant lights shine through—hello, geometric glow.
5. Turn A Blank Wall Into A Feature With Custom Patterns

If your room is feeling flat, treat lattice as art. Think beyond the classic square grid: go diagonal, diamond, or even a Japanese-inspired kumiko pattern for major impact. It’s texture, shadow, and architecture rolled into one.
Pattern Play
- Diamond lattice: Soft and classic—great for cottage or coastal vibes.
- Vertical slat lattice: Super modern; makes ceilings look taller.
- Kumiko-inspired: Intricate and zen—use sparingly as a focal panel.
Where To Use It
- Behind a desk: Creates a polished Zoom background that isn’t trying too hard.
- Dining wall: Frame a single large panel like a tapestry.
- Hallway niches: Add shallow lattice with LED backlighting for a boutique feel.
Make It Look Custom
- Frame it: Add clean border trim for a finished, built-in look.
- Shadow gap: Leave a tiny reveal between lattice and wall for depth (designer secret).
- Two-tone: Stain the lattice and paint the wall behind in a contrasting color for instant drama.
FYI: Prefab lattice sheets are budget-friendly, but upgrading to thicker stock or adding a frame takes it from garden center to gallery.
Buying Guide (Quick + Practical)
- Thickness: 1/2″ to 3/4″ feels high-end and resists warping.
- Spacing: 1″–2″ gaps = more privacy; 3″–4″ gaps = more light.
- Wood species: Pine is budget; oak, maple, or cedar look richer and last longer.
Installation Tips
- Pre-finish panels before installing to avoid drips and sticky corners.
- Use countersunk screws and wood plugs for a clean face.
- If renting, try tension rods or freestanding frames—no holes, no security deposit meltdown.
Styling Cheat Sheet
- Balance the grid: Add round mirrors, curved sofas, or globe lights to soften lines.
- Plant life: Tall, airy plants (olive tree, palm) echo the verticals without clutter.
- Textiles: Layer nubby throws and wool rugs so it doesn’t skew too “wood shop.”
Maintenance: Dust with a soft brush attachment; for stubborn spots, a barely damp microfiber cloth. Avoid soaking—wood has feelings.
Budget-Friendly DIY Ideas
- Poplar strips: Create your own grid with 1x2s; paint or stain to match.
- Room screen remake: Wrap an old folding screen with lattice and a crisp frame.
- Backlit magic: Add LED strips behind lattice for subtle evening glow—instant ambiance.
Bottom line: A wood lattice room divider is the unicorn of decor—stylish, airy, and endlessly adaptable. Whether you’re carving out an entry, elevating your bedroom, or giving your kitchen a graceful screen, lattice adds texture and privacy without the heavy-handed “wall” energy. Pick your pattern, match your finish, and let the light do the rest. Your space is about to look very “designer came over,” and I fully support that.